Using s3ql to store synapse's media_store on OVH Cloud Object Storage
Running your own Matrix home server using the current reference implementation synapse can require significant disk space for storing the database as well as the media_store, which is the directory containing all media files posted in Matrix rooms (including user avatars and audio and video messages). Even though the HDD space calculator in my experience overstates the required storage space (probably due to a round of space-saving improvements to the synapse code) it can still become a problem on small SSD-based servers.
While there is no easy fix for the space required by the database, it is pretty easy to deal with the space required by the media store: I am using s3ql to mount a virtual filesystem stored on OVH Cloud Object Storage (which is OpenStack-Swift-based) and regularly move old media to this filesystem. It is sufficiently easy to set-up, very stable in my experience up to now and with s3ql you get encryption, compression and de-duplication for free. You can also use s3ql with Amazon S3 & Co., but OVH is a bit cheaper and in my experience just as reliable.
Step 1: Set-up OVH Cloud Object Storage Container
First you need to register for an OVH Cloud account. Afterwards you can log into your management portal and select “Cloud” (1) - “Servers” - “Main” (2) - “Storage” (3) in the menu. There you can chose “Create a container” (4):
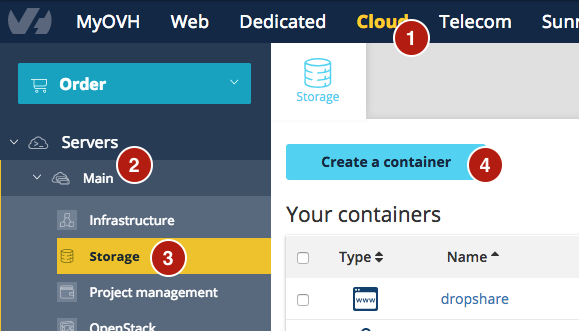
You have to select the data centre to host your data (choose BHS-1 if you are in North America and SBG-1 or GRA-1 otherwise), select “Private” as container type and give your container an easy to use name, such as “synapse_media_store” (which we will use for the examples going forward).
Next you need to obtain a user that can access this cloud container. For this, head over to “OpenStack” (1) and “Add user” (2). You can freely chose a description to identify that user, for example “synapse storage”. Afterwards immediately write down (in a password manager) the password (3) that is being displayed, because it will become invisible later:
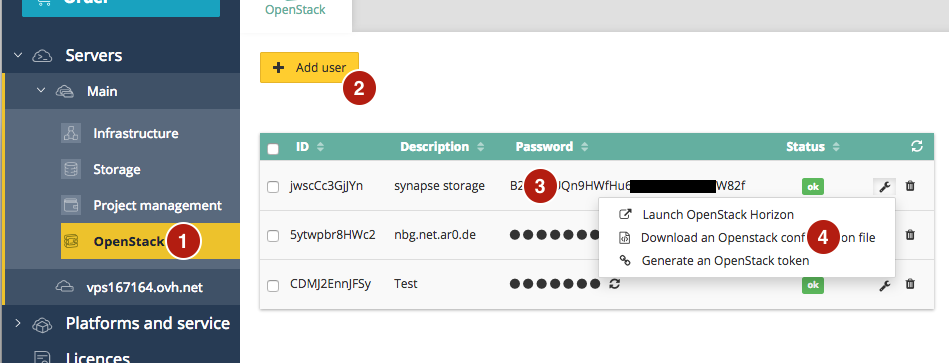
After the user is added, you need to download its openrc.sh file, which contains all other required configuration data. For this, click on the icon to the right of the new user and select “Download an OpenStack configuration file” (4). Select the same datacenter region as before for creating the container. Save the provided openrc.sh file, we will use it later.
Step 2: Install and configure s3ql
If you are using for example Debian (which I recommend for running synapse as it is what the developers are using), installing s3ql is as easy as apt-get:
apt-get install s3ql
If your distribution does not come with packages for s3ql, your best bet is probably the “Installation” chapter in its manual.
Afterwards, switch to the user running synapse (usually synapse) and perform the following steps there.
You need to create a credentials file that contains the access codes for accessing your OVH container. For this, open the file ~/s3ql_credentials.txt (or any other filename, really, just use the same one again below) in your favourite text editor and add the following data:
[swift]
backend-login: OS_TENANT_NAME:OS_USERNAME
backend-password: PASSWORD_FROM_ABOVE
storage-url: swiftks://auth.cloud.ovh.net/OS_REGION_NAME:CONTAINER_NAME
fs-passphrase: PICK_A_LONG_AND_SECRET_PASSPHRASE
You need to replace all the uppercase elements in this sample. The values for OS_TENANT_NAME (without the quotes), OS_USERNAME and OS_REGION_NAME come from the openrc.sh file you have downloaded above (just open it in a text editor). The PASSWORD_FROM_ABOVE was the password shown that I have asked you to write down above. The CONTAINER_NAME is the name you chose for your container, which will be synapse_media_store if you followed the example. The PICK_A_LONG_AND_SECRET_PASSPHRASE will be used to encrypt your data prior to the transfer to OVH. You should use a passphrase generator of your choice for it and you need to enter it again below.
Okay. Now it is time to prepare the new s3ql-based filesystem. Run the following command (replacing the path to the credentials file as necessary and OS_REGION_NAME as well as CONTAINER_NAME with the same values as above):
mkfs.s3ql --authfile ~/s3ql_credentials.txt swiftks://auth.cloud.ovh.net/OS_REGION_NAME:CONTAINER_NAME
This will test your access to the OVH cloud and will prepare the container for use as s3ql filesystem. You will also be asked for the passphrase you have chosen above.
Next you need to create a mount point on your local computer where you want to mount s3ql. It needs to be accessible by the synapse-running user, as that is the user that owns the media_store files. For example, you could do:
sudo mkdir /mnt/synapse_media_store
sudo chown synapse:synapse /mnt/synapse_media_store
Now, all that remains is to mount the filesystem:
mount.s3ql --authfile ~/s3ql_credentials.txt swiftks://auth.cloud.ovh.net/OS_REGION_NAME:CONTAINER_NAME /mnt/synapse_media_store
Note that we do not add the s3ql filesystem to the system fstab. This is because we can only mount it after network access has been fully established. I recommend integrating the s3ql mount into whatever init script you use to launch synapse and mount the filesystem just before launching synapse.
Step 3: Move old stuff and replace it with symlinks
Ok. Now we have an empty filesystem on cloud storage. All that remains is to move some or all media files onto that filesystem. I am currently using an approach where I move files which haven’t been accessed in quite a while to this “off-site” storage. I use the following small shell script for this which I run monthly via cron:
!/bin/sh

SYNAPSE_STORE=/home/synapse/media_store
TARGET_STORE=/mnt/synapse_media_store

cd $SYNAPSE_STORE

find -P $SYNAPSE_STORE -xdev -type f -atime +90 -printf "%P\n" | \
   while read FILENAME
   do
    echo Moving $FILENAME...
    cp --parents $FILENAME $TARGET_STORE && \
     rm $FILENAME && \
      ln -s $TARGET_STORE/$FILENAME $FILENAME && \
       echo Successfully moved $FILENAME.
   done
It moves all files which haven’t been accessed in the last 90 days to the s3ql mount point and replaces them with symlinks to their new location. A downside of this approach is the additional clutter and, more importantly, that it will stop the purge_remote_media API from working: If you remove old remote media using the API, it won’t delete the files on cloud storage. You would thus need to write a script that checks for the existence of symlinks and removes all files from cloud storage which have no links pointing to them anymore. Alternatively you can use purge_remote_media to keep your remote media storage in check and only apply the move script above to your local_content and local_thumbnails.
Another alternative is to just move your entire media_store: So far, I have found s3ql to be sufficiently stable to probably being able to do so safely. It provides intelligent caching, so frequently accessed files don’t get re-downloaded from cloud storage all the time. If you want to go down that route, you can just move all data from the media_store directory into your new filesystem (with synapse stopped) and afterwards just change the homeserver.yaml configuration to point to the new path. No need for any script. If you go down this path, however, it becomes imperative that you include the mount.s3ql command into your synapse launch scripts!